Keeping track of your pet’s daily adventures can be challenging, especially in busy American homes where pets roam freely from room to room. Smart camera placement and advanced controls do more than just record behavior—they allow you to monitor activity zones, minimize blind spots, and stay connected with your pet no matter where you are. By focusing on optimal camera placement and interactive features, you set the foundation for clearer video, reliable alerts, and real-time engagement that truly supports modern pet care.
Table of Contents
- Step 1: Select Ideal Placement For Maximum Coverage
- Step 2: Configure Video And Audio Settings For Clarity
- Step 3: Enable Interactive Features For Remote Engagement
- Step 4: Set Up Smart Alerts For Real-Time Monitoring
- Step 5: Verify Optimized Settings For Effective Operation
Quick Summary
| Key Point | Explanation |
|---|---|
| 1. Prioritize Camera Placement | Identify your pet’s main activity zones to eliminate blind spots and ensure camera coverage in key areas of your home. |
| 2. Optimize Video and Audio Settings | Adjust video quality and audio sensitivity to enhance clarity and reduce background noise, tailoring settings to your home lighting conditions. |
| 3. Enable Interactive Features | Activate two-way audio and treat dispensers to engage with your pet remotely and provide rewards, reducing anxiety during your absence. |
| 4. Configure Smart Alerts | Set up motion and sound alerts to receive notifications about your pet’s behavior, tailoring sensitivity to minimize false alarms while staying informed. |
| 5. Verify Camera Performance Regularly | Conduct tests on all features periodically to ensure video clarity, alert efficacy, and interactive functions remain consistent and effective. |
Step 1: Select ideal placement for maximum coverage
Thinking about where to position your pet camera might seem straightforward, but the difference between good coverage and great coverage comes down to one thing: understanding your home’s layout and where your pets actually spend their time. The goal here is to eliminate blind spots while keeping tabs on the areas that matter most, whether that’s where your dog naps, where your cat likes to climb, or the entry points you want to monitor for security.
Start by walking through your home and identifying your pet’s primary activity zones. Most pets follow predictable patterns—they have favorite spots, regular routes through hallways, and preferred windows or doors where they watch the outside world. These areas should be your first priority for camera placement. Think about the hallways and main stairs your pet travels through multiple times daily, the living room where they spend afternoons, or the kitchen where they hang out during meal prep. Beyond pet activity, consider security camera placement best practices, which recommend covering ground-floor entry points and common areas to maximize visibility while minimizing blind spots. This principle applies perfectly to pet monitoring because your camera positions should protect both your pet’s safety and your home’s security.
Next, assess the physical layout of each room where you want to place a camera. You’ll want your camera positioned at an angle that captures the entire area without obstruction from furniture, doorways, or wall angles. Mount cameras at a height that gives you a clear view of your pet at their eye level and below—this means if you’re monitoring a cat, eye level might be three to four feet off the ground, while a dog might need the camera positioned slightly higher to catch their movements. Pay attention to natural light sources too. Position your camera to take advantage of natural lighting during the day, and if you’re placing it near a window, angle it to avoid glare on the lens. Hallways are particularly valuable positions because they act as transition points where your pet moves between rooms, giving you excellent sightlines into multiple areas of your home without requiring multiple cameras.
Consider the camera’s field of view and how it covers the space. Most pet cameras offer wide-angle lenses between 130 and 160 degrees, which means you can monitor significant areas from single positions. However, testing the actual coverage in your space matters more than specs on paper. If your camera has a mobile app with live view, take time to test different positions before permanently mounting it. Move the camera around the room, check the app, and see which angles give you the most comprehensive view of your pet’s behavior and movement patterns. Corners often work better than straight walls because they allow the camera to see into multiple rooms simultaneously.
One more practical consideration: make sure your camera placement allows for reliable WiFi signal. Pet cameras need strong connectivity to transmit video smoothly and respond quickly to two-way audio commands. If you’re considering a spot in a far corner or basement, test your WiFi strength there first. A beautifully positioned camera with weak connectivity defeats its purpose because you’ll experience lag and buffering when you need to check on your pet quickly.
Pro tip: Start with one camera positioned at a central hub like your main hallway or living room entrance, then identify any remaining blind spots after living with that placement for a few days. Adding a second camera to cover gaps often works better than trying to predict perfect coverage from the start.
Use this quick reference to set optimal camera placement by pet type:
| Pet Type | Typical Activity Zones | Suggested Camera Height | Key Visibility Focus |
|---|---|---|---|
| Dog | Living room, doorways | 4-5 feet off the floor | Entry points, dog beds, hallways |
| Cat | Windowsills, tall furniture | 3-4 feet off the ground | Climbing spots, window perches |
| Multiple | Common areas, play zones | 4 feet for broad coverage | Shared areas, feeding spaces |
Step 2: Configure video and audio settings for clarity
Now that your camera is positioned strategically, it’s time to fine-tune the settings that transform raw video into actually useful footage. Good placement means nothing if your pet’s movements blur into pixelated streaks or if the audio picks up everything except your dog’s barking. Configuring your video and audio settings properly takes about fifteen minutes but makes the difference between footage you can actually analyze and footage that sits unwatched on your phone.
Start with video settings by opening your camera app and locating the video quality or resolution options. Most pet cameras let you choose between standard definition, 720p, 1080p, or even 2K resolution. Higher resolution sounds better, but here’s the reality: higher resolution eats more bandwidth and storage space. If your WiFi connection struggles or you’re storing weeks of footage, standard or 720p works fine for monitoring pet behavior. The key is adjusting exposure and gain settings together to balance light levels and reduce noise, which makes your actual footage clearer regardless of resolution. If your camera has manual exposure control, test it under your typical lighting conditions. Adjust exposure upward in dim rooms or basements, and pull it back in naturally lit areas to avoid washed-out video. Many cameras also offer white balance adjustment, which fixes color tinting that happens under different light sources. A living room lit by warm incandescent bulbs looks completely different from a kitchen lit by cool LED panels, so spend a moment getting the white balance right for each camera location.
Next, focus on audio configuration because hearing your pet is often as important as seeing them. If your camera has adjustable microphone sensitivity, start at a moderate level and test it from different distances in the room. Too sensitive and you’ll record every air conditioner hum and background noise. Too insensitive and you’ll miss important sounds like excessive barking or signs of distress. Most pet owners find medium sensitivity works well because it captures their pet’s sounds without overwhelming background noise. Check whether your camera allows you to enable or disable two-way audio separately from recording. Some models let you adjust the speaker volume independently from microphone sensitivity, which matters because you might want a quiet microphone but a louder speaker so your dog actually hears you when you talk to them.
After adjusting exposure, white balance, and audio levels, test everything by recording a short clip while your pet is in the room doing normal activities. Watch the playback and ask yourself specific questions: Can you clearly see your pet’s facial expressions? Can you hear their breathing or light movements? Are colors accurate or does everything look orange or blue? If something looks off, adjust one setting at a time rather than changing everything at once. That’s how you actually figure out which adjustment made the difference.
Some cameras also offer focus adjustments. If your camera supports manual focus, use it. Auto-focus can struggle when your pet moves between different distances from the camera, causing blurriness as it constantly refocuses. Manual focus locks onto a specific distance, which works great if your pet spends most time at a predictable distance from the camera. If you have an exceptionally active pet who ranges all over the room, auto-focus might work better because it keeps up with the movement.
Pro tip: Configure your settings during the time of day when your pet is usually monitored, whether that’s early morning, afternoon, or evening. This ensures your exposure and audio settings match the actual lighting and activity levels you’ll be observing most often.
Step 3: Enable interactive features for remote engagement
With your camera positioned and video settings optimized, it’s time to unlock the interactive features that transform your pet camera from a simple surveillance tool into a two-way communication device. These features let you talk to your pet, watch them react in real-time, and even dispense treats or activate toys while you’re away. Enabling these capabilities properly means you can actually bond with your pet from across town, not just passively watch them.
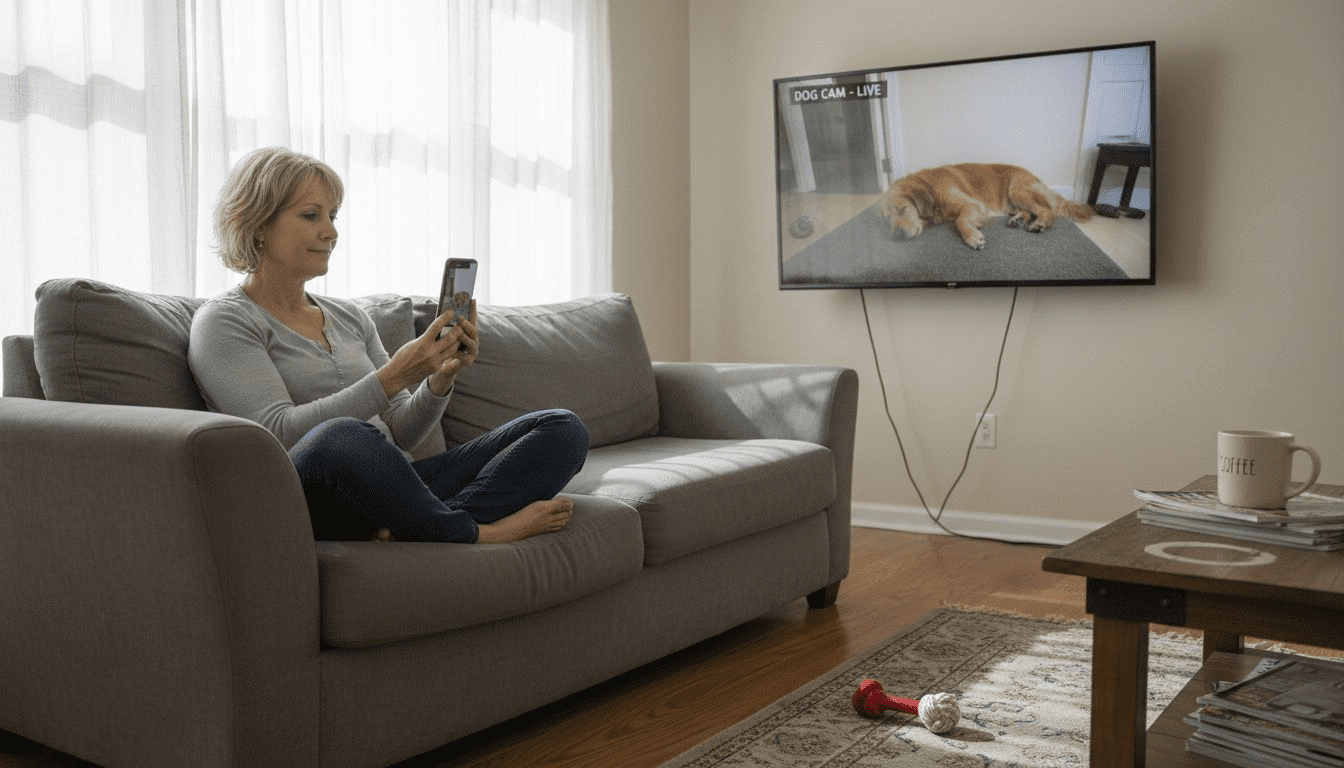
Start by opening your camera’s mobile app and locating the settings section for interactive features. Most pet cameras support real-time video and audio communication that enables two-way interaction between you and your pet. This typically includes a speaker button or talk feature that lets you speak through your camera’s audio system. Before you rely on this feature, test it thoroughly. Open the app from your phone, tap the talk button, and have someone in the room with your pet confirm that the audio comes through clearly and at a comfortable volume. Your dog needs to hear you without the speaker blasting so loud it startles them. Adjust your speaker volume in the settings until the audio sounds natural, like you’re speaking from across the room rather than shouting through a megaphone. Many pets respond better to calm, familiar tones, so test different volume levels to find what makes your dog perk up and pay attention rather than jump back in alarm.
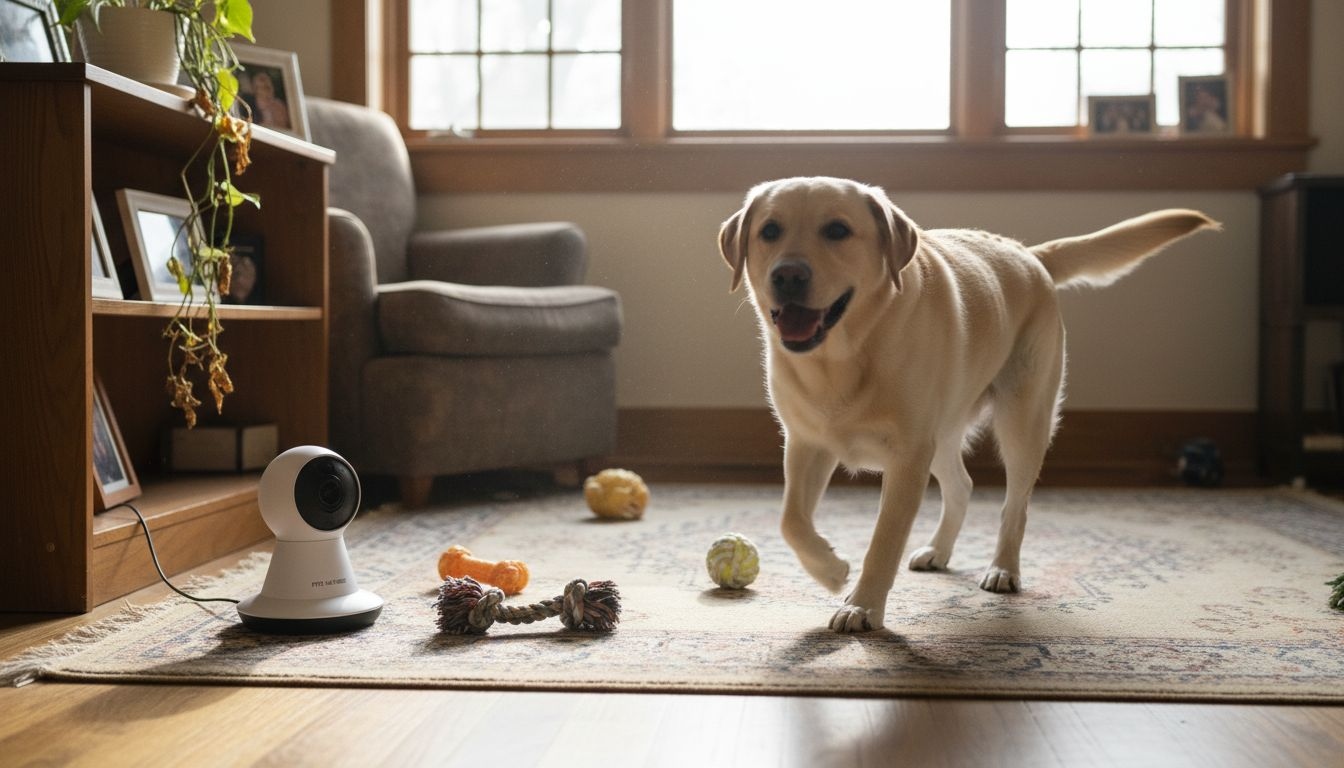
Next, if your camera includes treat dispenser or toy activation features, enable those in the app settings. These remote features let you reward your pet’s behavior even when you’re not home, which can be incredibly helpful for reducing separation anxiety. Some cameras integrate with automated feeding systems that you can control remotely, allowing you to manage feeding schedules and deliver rewards via voice commands and remote controls. If your camera has a built-in treat dispenser, test it before relying on it. Load a small number of treats, activate it through the app, and make sure it actually dispenses them properly. Nothing’s more frustrating than assuming your camera is rewarding your pet all day when treats are actually jamming inside. If treat dispensing requires internet connection, test it from outside your home to verify it works on mobile data, not just home WiFi. Many pet owners make the mistake of assuming their interactive features work everywhere, then discover they only work on their home network.
If your camera has panning or zooming capabilities, enable those controls and spend a few minutes learning how they work. Some cameras offer manual pan and tilt where you use on-screen arrows to move the camera view in real-time. Others let you set up preset positions that you can tap quickly to switch between different room angles. Preset positions work great if you have several favorite spots you want to check repeatedly. If your camera supports automatic motion tracking, enable that feature and test how well it follows your pet. Motion tracking works beautifully in some scenarios and completely loses your pet in others depending on their speed and your lighting conditions.
Finally, check your notification settings for interactive features. Most cameras can alert you when motion is detected or when your pet uses certain features like the treat dispenser. Configure these alerts to match your preferences. If you work in an office where constant notifications would be distracting, set them to only high-priority events. If you work from home and want to be notified every time your pet moves, enable more frequent alerts.
Pro tip: Start with just two-way audio enabled and test it for several days before adding other interactive features. This helps you understand your pet’s comfort level with your voice coming through the camera before surprising them with automated treat dispensing or sudden toy activation.
Here’s a summary of how different pet camera features impact pet monitoring and owner experience:
| Feature | Benefit to Pet | Benefit to Owner |
|---|---|---|
| Two-way Audio | Comforts anxious pets | Enables remote reassurance |
| Treat Dispenser | Encourages good behavior | Lets owner reward from afar |
| Motion Detection | Prompt safety response | Immediate incident notifications |
| Night Vision | Monitors in darkness | Reliable 24/7 visibility |
| Mobile Live View | Sees owner’s presence | Real-time pet check-in |
| Pan & Zoom Controls | Increased engagement | Wider and more flexible coverage |
| Custom Alerts | Less stress from noise | Reduces false notifications |
Step 4: Set up smart alerts for real-time monitoring
Now that your camera is positioned, configured, and ready for interaction, it’s time to set up alerts that actually matter. Smart alerts are what transform your pet camera from a passive recording device into an active monitoring system that notifies you when something important happens. Without proper alert configuration, you could miss the exact moment your cat knocks something off the shelf or your anxious dog starts pacing before a storm arrives.
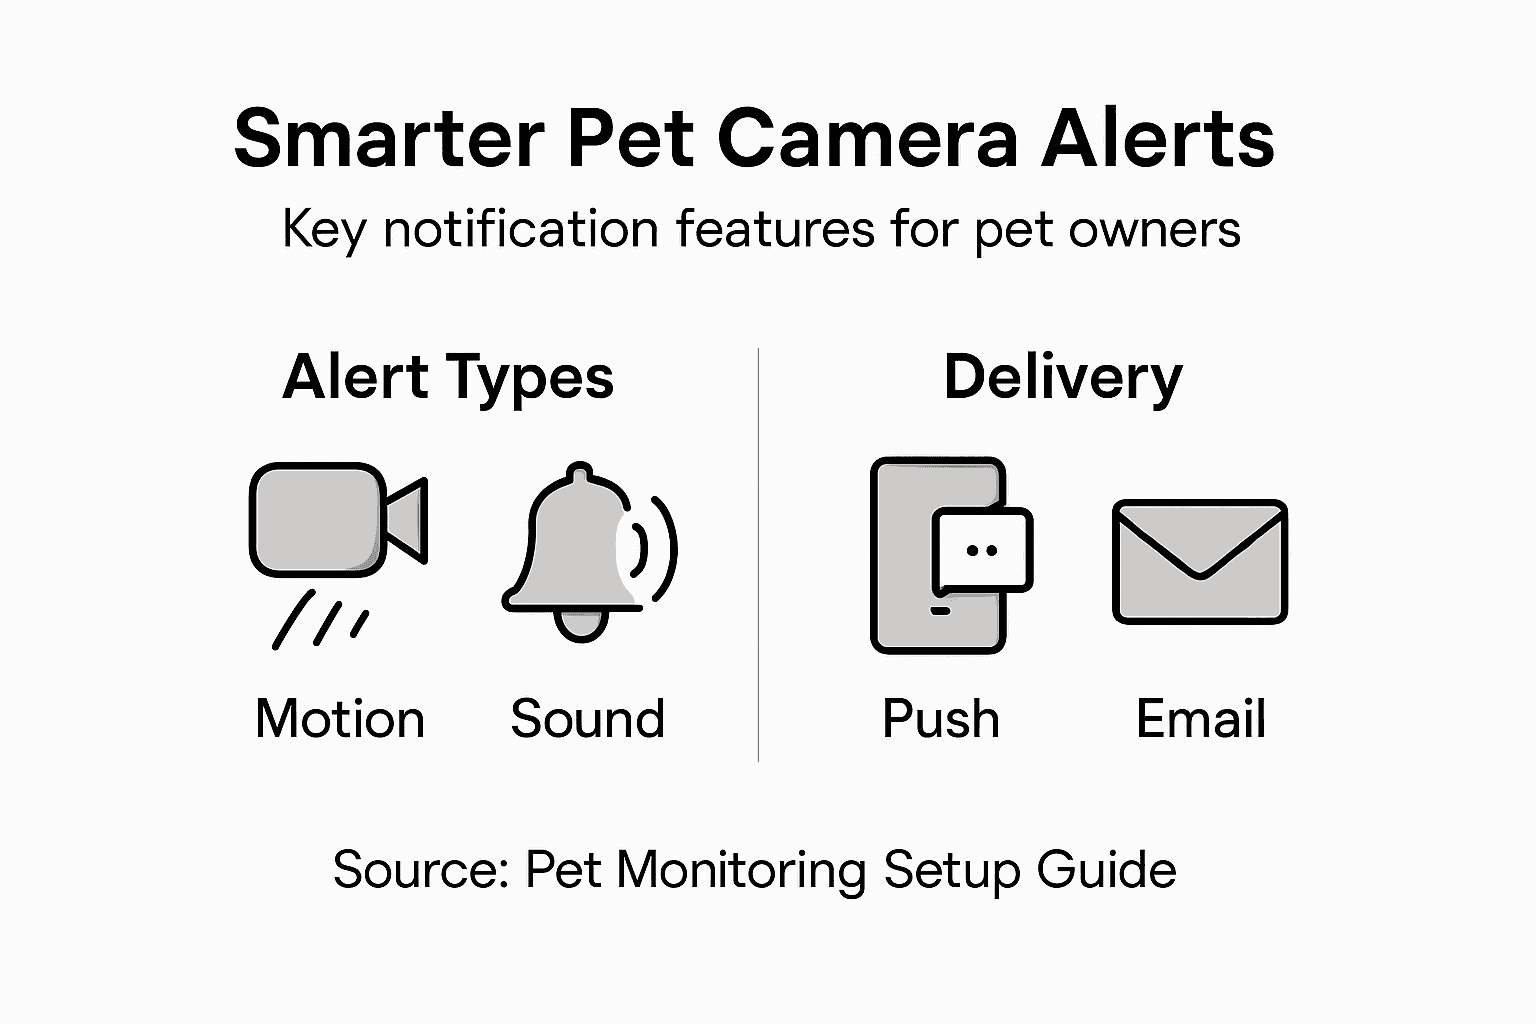
Begin by accessing your camera app’s notification settings, typically found in the main settings menu. You’ll find options for different alert types, and this is where you get to decide what actually deserves your attention. Most pet cameras offer motion detection alerts, which notify you whenever movement is detected in the camera’s view. However, motion alerts come with a trade-off. If you set them too sensitive, you’ll get bombarded with notifications every time shadows move across your room or your ceiling fan rotates. If you set them too low, you’ll miss genuine activity. Start with medium sensitivity and test it for a day. If you’re constantly interrupted by false alerts from lighting changes or dust particles, dial down the sensitivity. If you’re missing your pet’s actual movements, turn it up. The goal is finding the sweet spot where you get notified about your pet’s behavior without drowning in pointless alerts about environmental changes.
Next, explore sound or audio-based alerts if your camera supports them. These alerts specifically trigger when your camera detects barking, meowing, or sudden loud noises. Sound-based alerts work brilliantly for detecting distress or unusual behavior because they’re more selective than general motion detection. A barking alert in the middle of your workday tells you something specific is happening, not just that your pet moved across the room. Configure sound sensitivity carefully because dog and cat vocalizations vary dramatically. A playful bark sounds very different from anxious barking, but your camera can’t distinguish between them, so you’ll get alerts for both. Use this feature strategically, activating it when you’re most concerned about potential issues rather than leaving it on constantly throughout the day.
If your camera includes geofencing capabilities or location-based alerts, enable those features to receive notifications when you arrive home or leave the house. Some pet cameras integrate with IoT-based monitoring systems that send alerts when pets move beyond predefined boundaries, which helps track whether your pet escaped an enclosure or entered a dangerous area. While traditional pet cameras don’t track your pet’s location, they can still send alerts when motion stops being detected for unusual periods, which might indicate your pet left the monitored area. Test these boundary-based alerts by moving around outside your camera’s field of view and verifying that alerts trigger appropriately.
Consider setting up customizable alert schedules that match your daily routine. You might want full notifications during work hours but quieter alerts during sleep or family time. Most modern pet cameras allow you to create alert schedules by day and time, so you can have different alert settings for weekdays versus weekends. If you work from home, you might prefer fewer alerts during your lunch break when you can respond immediately anyway, but more frequent alerts during important meetings when you need to know immediately if something goes wrong.
Finally, configure alert destinations. Most cameras send notifications to your phone, but some also support email alerts, text messages, or integration with smart home systems. If your phone is on silent during meetings, email alerts ensure you catch important notifications later. If you have a household with multiple pet owners, set up alerts that go to everyone’s phones so any family member can respond quickly if something requires attention.
Pro tip: During your first week with smart alerts enabled, keep a simple log of which alerts were actually useful versus which were false positives. This data helps you fine-tune your alert settings to match your pet’s actual behavior patterns rather than guessing what will work best.
Step 5: Verify optimized settings for effective operation
You’ve positioned your camera, adjusted video and audio settings, enabled interactive features, and configured smart alerts. Now comes the critical step that most pet owners skip: actually verifying that everything works as intended under real-world conditions. This verification phase catches problems before they become frustrations, ensuring your entire setup delivers the monitoring experience you expected.
Start by running a comprehensive test of all your camera’s core functions over a full 24-hour period. This means testing your camera at different times of day when lighting conditions change, when your pet is most active, and when the house is quiet. Set up your phone or computer to view the live feed, then leave the room and check the feed from different locations. Can you see clearly in morning light? Does the video quality hold up in evening darkness when night vision activates? Test your two-way audio by speaking through the camera and confirming your pet responds appropriately. Test treat dispensing if you have it, making sure treats actually dispense and your pet receives rewards. Test your motion detection alerts by walking past the camera and verifying notifications arrive promptly on your phone. Don’t test just once. Test multiple times because camera performance can vary depending on network conditions, lighting, and activity levels.
Pay specific attention to video clarity during the times when you’ll actually be monitoring your pet. If you work from 9 to 5, test your camera at those hours specifically. Notice whether the video quality degrades during peak WiFi usage times when family members are streaming or downloading large files. Test from different rooms in your home and from outside your home on mobile data to ensure your camera performs consistently regardless of connection method. If you notice the video becomes choppy or pixelated during certain times, you may need to adjust your resolution settings or optimize your WiFi network. Some pet owners discover their cable internet gateway sits in a different part of the house from their pet camera, causing weak signal. Moving your router, using WiFi extenders, or switching to a camera closer to your router can dramatically improve performance.
Next, validate your alert configuration by intentionally triggering alerts and measuring response times. When you walk past your camera, how long does the motion alert take to reach your phone? If it takes 30 seconds or a minute, that’s likely acceptable. If alerts are delayed by several minutes, your WiFi connection might be struggling or your camera might need a firmware update. Test sound alerts by making noise near your camera and confirming the barking or meowing detection works. Test your customized alert schedules by changing the time settings and verifying that alerts turn on and off at the scheduled times. Many pet owners set up schedules, assume they work, and discover weeks later that alerts have been running at the wrong times.
Consider performing an interactive calibration with real-time feedback to verify your camera’s image clarity and remove any distortion. Some advanced pet cameras offer calibration tools that help you optimize focus and correct lens distortions that might affect image quality. If your camera provides calibration features, use them to ensure you’re getting the clearest possible video. This is especially important if you notice slight blurriness or edge distortion in your recordings.
Finally, create a testing checklist that you reference weekly during your first month of ownership. Check that video quality remains consistent, that alerts still arrive on time, and that interactive features like treat dispensing continue working reliably. Document any issues you notice and address them immediately while the camera is still within return windows if you purchased from a retailer. This proactive approach prevents small problems from becoming major frustrations.
Pro tip: Record a 30-second video clip at different times of day and in different lighting conditions, then save these samples to compare. If you notice video quality degrading over weeks or months, these clips help you identify whether it’s a camera issue, network problem, or settings that drifted from your original configuration.
Unlock Smarter Pet Monitoring with Expert Guidance and Reviews
Struggling to find the perfect pet camera setup that combines ideal placement, crisp video quality, and interactive features? This article highlights common challenges like positioning your camera for maximum coverage and configuring settings for clear audio and video. At ModernPetTech, we understand how crucial it is to reduce blind spots, control treat dispensing, and receive meaningful alerts to strengthen your bond with your pet while ensuring their safety.
Explore our comprehensive Pet Cameras section to compare top models that fit your home environment and pet behavior. Dive into detailed Guides & Comparisons to master smart alert setups and two-way communication features. Don’t wait to enhance your remote pet monitoring experience. Visit modernpettech.com today and take the first step to smarter, stress-free pet care.
Frequently Asked Questions
How do I find the ideal placement for my pet camera?
To find the best placement for your pet camera, observe where your pets spend the most time and identify their primary activity zones. Position the camera to cover entry points and common areas, making adjustments based on your home’s layout to eliminate blind spots.
What video and audio settings should I adjust for clearer pet monitoring?
To enhance video quality, choose a resolution that balances clarity with bandwidth needs, such as 720p or 1080p. Adjust the microphone sensitivity to capture significant sounds without background noise, aiming for settings that accurately reflect your pet’s typical sounds.
How can I enable interactive features on my pet camera?
To enable interactive features, open your camera’s mobile app and adjust the settings for two-way audio, treat dispensing, and any available motion tracking. Test each feature to ensure they operate smoothly and effectively support your interaction with your pet while you’re away.
How do I set up smart alerts for my pet camera?
Access your camera app’s notification settings to configure smart alerts based on motion and sound detection. Tailor alert sensitivity to reduce false notifications while ensuring you receive timely updates about your pet’s movements and unusual behavior patterns.
What should I do to verify that my pet camera settings are working as intended?
To verify your pet camera settings, conduct a thorough test over a 24-hour period, checking video quality, audio clarity, and alert notifications. Document any issues, and adjust settings as needed to maintain effective monitoring.
How can I ensure my pet camera remains effective over time?
To ensure ongoing effectiveness, create a weekly checklist to review key camera functions, including video quality and alert settings. Adjust your configuration based on your observations and document any changes to improve your monitoring experience.
Recommended
- 7 Pet Monitoring Best Practices for Tech-Savvy Owners
- Pet Camera Features Breakdown: Smarter Pet Care
- Pet Camera Setup Basics: Enhancing Remote Pet Care
- Pet Camera Setup Explained: Boosting Safety and Connection
- 7 Key Advantages of Automatic Pet Feeders for Busy Owners – Pawfect Picks
2 thoughts on “Optimize Pet Camera Features for Smarter Pet Monitoring”